.
 I'm way too early finishing my birthday card for Dustine, my oldest brother's grandson, who will be turning 7 on December 15. I'm trying to finish all the cards due for December birthdays so I can concentrate on my Christmas cards.
Just like a typical boy his age, Dustine is into animals. I made the Angry Birds card for his birthday last year. I got the idea for this Panda card from a post shared by Sue Busch on our Facebook group Silhouette Cameo Paper Crafts. She made this adorable card using the same adorable Panda design from the Silhouette store which I happen to already have in my library. The name of the design is Zoo Panda by Sarah Bailey. Please note that there are two Zoo Panda designs on the Silhouette store which look exactly the same, one is a regular cut file and the other one is a print and cut file. Although I have both, I used the regular cut file. Sue used the print and cut file.

When I purchased my first Silhouette machine (SD) more than 2 years ago, they used to offer the unlimited subscription for a discounted $14.99 a month which meant you can download an unlimited number of designs or ALL at any time during your one year subscription. So we were simply downloading all the new designs being released each week. I accumulated over 13,000 designs. I think I was one among the last ones that were able to avail of this unlimited subscription. When Silhouette America bought the Silhouette line from Quickutz, they never offered the unlimited subscription anymore.So that explains why I can't even remember which designs I already have in my library :).
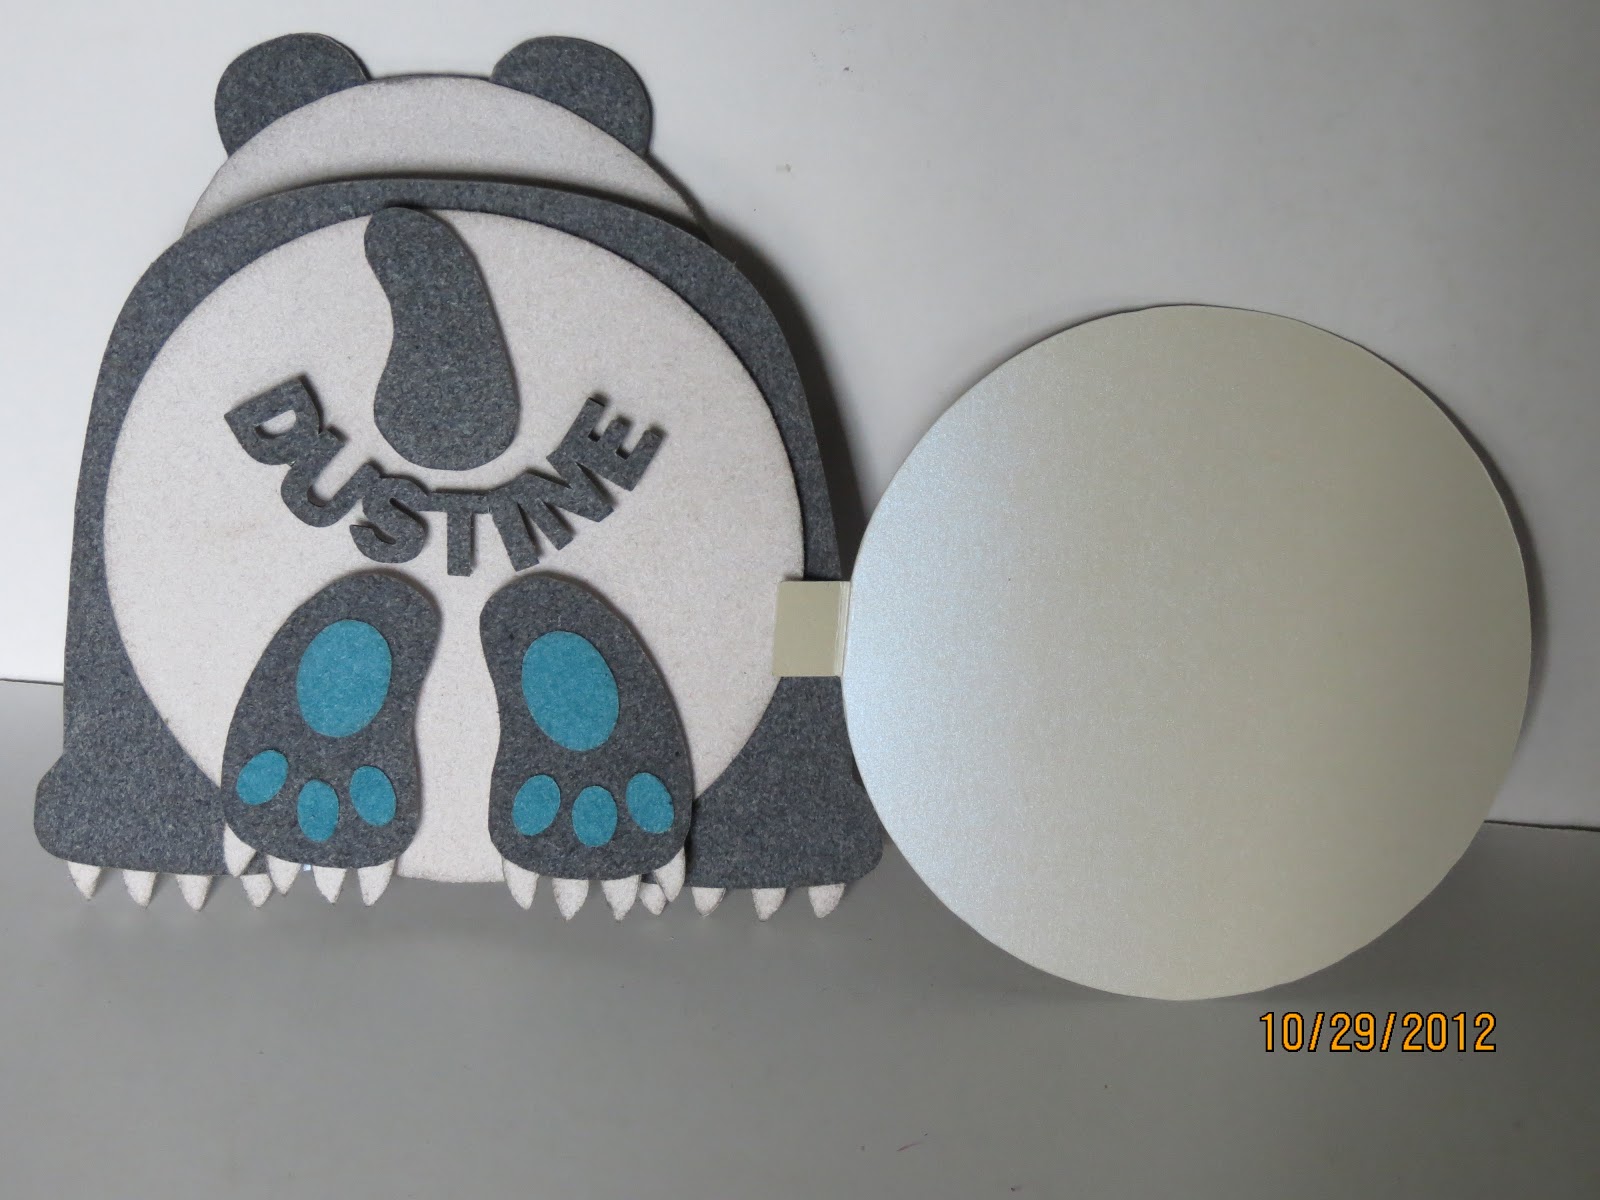
The back of the Panda is even cuter. Just take a look at that butt and the back of his feet with his paws. Sooooooo stinking cute!!! Dustine will be humored finding his name on his butt. It's so easy to toggle the text into any shape like this using the drawing tools in Silhouette Studio. Instead of writing the step by step instructions on how to do this, I searched for a video tutorial that is very easy to follow, Text-to-Path tutorial by doodling Debbie. This is a great technique to learn about text most especially in creating sentiments. BTW, you will need to ungroup the letters to make sure that the top part of the letters are touching enough so they can be welded together and cut in one piece instead of individually. I didn't want to bother having to arrange the letters one by one on my card after the letters have been cut. There is actually a technique using a mesh tape (drywall tape) in transferring the arranged text from your mat onto your project: Die Cut Transfer With Mesh.


Just like a typical boy his age, Dustine is into animals. I made the Angry Birds card for his birthday last year. I got the idea for this Panda card from a post shared by Sue Busch on our Facebook group Silhouette Cameo Paper Crafts. She made this adorable card using the same adorable Panda design from the Silhouette store which I happen to already have in my library. The name of the design is Zoo Panda by Sarah Bailey. Please note that there are two Zoo Panda designs on the Silhouette store which look exactly the same, one is a regular cut file and the other one is a print and cut file. Although I have both, I used the regular cut file. Sue used the print and cut file.

When I purchased my first Silhouette machine (SD) more than 2 years ago, they used to offer the unlimited subscription for a discounted $14.99 a month which meant you can download an unlimited number of designs or ALL at any time during your one year subscription. So we were simply downloading all the new designs being released each week. I accumulated over 13,000 designs. I think I was one among the last ones that were able to avail of this unlimited subscription. When Silhouette America bought the Silhouette line from Quickutz, they never offered the unlimited subscription anymore.So that explains why I can't even remember which designs I already have in my library :).
The back of the Panda is even cuter. Just take a look at that butt and the back of his feet with his paws. Sooooooo stinking cute!!! Dustine will be humored finding his name on his butt. It's so easy to toggle the text into any shape like this using the drawing tools in Silhouette Studio. Instead of writing the step by step instructions on how to do this, I searched for a video tutorial that is very easy to follow, Text-to-Path tutorial by doodling Debbie. This is a great technique to learn about text most especially in creating sentiments. BTW, you will need to ungroup the letters to make sure that the top part of the letters are touching enough so they can be welded together and cut in one piece instead of individually. I didn't want to bother having to arrange the letters one by one on my card after the letters have been cut. There is actually a technique using a mesh tape (drywall tape) in transferring the arranged text from your mat onto your project: Die Cut Transfer With Mesh.
I made this into a 3D card by using dimensional tape on the layered parts of the Panda using my homemade pop-up dots.It is also interactive as the head wiggles (see video) using Margaret Wilburn's Springy-Thingy that I've used on my other kiddie cards like Swing Card, Spin card and Angry Birds card.. The card looks so much better in person because of the felt paper that I used giving it a fussy texture/ Instead of the eyes provided in the design, I used a pair of craft eyes which made the Panda even cuter. I created the creases on the face (brows and smirk) so I can cut them and layer them on the face (used black felt paper) and added the 2 tiny ovals for the nose. I also added the 'inside of the ears (used blue felt paper) by doing an internal offset of the ears. I also made the tail larger than the scaled size in the file. The sheets of felt paper that I have are all one sided (plain white on the back/wrong side) so I had to cut 2 pieces for each layer (except for the parts of the face) and glued them together to show the same texture and color on the Panda's back.The actual size of my Panda card is, from the top of the ears down to the tip of the paws is 5.5" tall and 5.5." wide (widest part of the legs).
I was lost as to where to put the space for writing the message on the card as I want to keep the back side of the Panda open and exposed. I replicated the exact same round shape of the body and welded a small tab on one side to be attached (tucked under) on the side of the back of the Panda where I can write my birthday message but I may end up foregoing this part as I don't think Dustine will really care much for it as he will just be interested in the Panda :).


Hi Gayle!
ReplyDeleteIt was beautiful card!
I like everything that has dimension in 3D.
Congratulations!
This is fantastic love the design. Caroline xxx
ReplyDeleteYour panda design is darling.
ReplyDeleteThat is so cool! Thanks for loading all the pictures! Love it!!
ReplyDeleteSue
Cute! Love it !
ReplyDeleteYone
Love the panda - I would love the file - thanks for sharing!
ReplyDeletePatty M
patricia.mckernan@att.net