Come And Join Me In My Creativity Zone

Come and join me in my Creativity Zone where you can enjoy fun and challenging card design ideas that will inspire you to learn new techniques to maximize the use of your craft tools, most especially the Silhouette Cameo machine along with the Silhouette Studio Designer software, and truly enjoy your crafting to the fullest.

All my files are shared for free, ONLY with my blog followers. The files are in Silhouette Studio format. They are for PERSONAL use only and must not be redistributed. You can share by directing people to the link of the project/post on my blog. Thank you for your compliance.

Tuesday, May 31, 2011

Armoire Card

I finally finished my armoire card. I finished the templates for this card a while back but I experienced what I call a 'creativity block' and struggled putting the finishing touches. Like I mentioned previously, I got the idea for this card from my antique armoire in my living living room where I keep my entertainment center.

I created the templates for the base of the card and its layers. The corner borders (2 different designs on the card) were traced from a free clip art website with no restrictions on sharing. The flourishes on the sentiment inside the card are designs from Silhouette. I created the flourish on top of the armoire using a corner border which I duplicated and welded together then added another portion of the corner border and welded it on both sides of the created flourish. The finished flourish is nothing like the original corner border. I enjoyed making this flourish. The letters on the door of the armoire were made from multiple cuts glued together to create the 'faux chipboard' look.The sentiment hanging on the door handle is my creation and the layered tag design is from Silhouette. I put a fine yellow ribbon to cover the holes of the 'stitches' that I created on the doors. Don't you just love the door handles? They are so cute! They are actually brads that I found at a notions store here. I wanted to keep the back of the doors clean so I bent the prongs and applied the glue on the bent prongs.


This time, I'd like to share the free files exclusively to my followers only. Sorry folks, this may just be the way to increase my followers. :). To my dear followers, send in your request now via your comments. For those who have not signed up yet, now is the time. (^_~). Thanks for stopping by.

Wednesday, May 25, 2011

Old Cards And Other Creative Stuff

I'm taking a break from kiddie cards and I'm currently working on a new card design replicating an armoire (cabinet). I have an antique armoire in my living room which I use for an entertainment center. The piece inspired me to create a card design using the concept. You'll love the beautiful templates that I've created for the armoire card. I'll be posting it once it's done.

Meanwhile, here are some cards and other creative stuff that I've been meaning to post.Thank you for stopping by to take a look.


Saturday, May 14, 2011

Spin Card-Another Fun Card


I made this card for my brother’s grandson, Dj, who will be celebrating his 1st birthday on May 24. Need I mention that he loves Sponge Bob? This card is actually a spin from the Swing card – but that’s not the reason why I call it the spin card (^_~). Unlike the swing card which simply flips back and forth, the spin card spins all the way around.  I used the same template for the swing card and I just cut the frame all the way through to make way for hanging the base holding Sponge Bob in order for it to spin all the way around. I used a clear nylon thread to hang the base holding Sponge Bob which is also holding Dj’s very cute photo on the other side. The nylon thread is neatly glued with a double sided tape in between the layers of the base holding Sponge Bob, attached to the base of the card, both top and bottom. I had so much fun using Margaret Wilburn’s ‘springy-thingy’ on Benjamin’s swing card and I can’t resist using it again on Dj’s card. I can hardly wait to hear his giggles once he sees Sponge Bob rocking and jiggling.
To add more fun on the card, just before putting the card in an envelope, turn the base holding Sponge Bob spinning it around in one direction several times, hold it down with Sponge Bob face side up and carefully put the card inside the envelope and seal. When the recipient opens the card, Sponge Bob will be automatically spinning around.

Here is a video tutorial where I got the idea of the spin card. The creator, ‘TheCoutureCrafter’ calls it the interactive spinner card : http://www.youtube.com/watch?v=TGleyWgr6Lk


There is another card that’s also called a spinning or spinner card which is actually a slider card. It is very different from Dj’s spin card.

If you would like to have the '1 year', 'yeheeey', 'happy birthday' and the files from the swing card like the 'adorable' and 1st year', you can request for the files on your comment below. For those who missed the swing card templates, you can also request for the files. PLEASE do not forget to leave your e-mail address. 

Saturday, April 30, 2011

Easel Card With A 'Mirror'


The inspiration for this card was a regular two-fold card from DoCrafts.com created by Acorns (link below). There was no detail on how it was made aside from the description, ‘die cut butterfly on acetate’.  I was intrigued by the mirror effect and took a closer look. The next thing I knew I was cutting away. Coincidentally, I happen to have seen the exact same butterfly design which is a free file  from Dream Scrapbooks (link below) which is actually on a SCAL (Sure Cuts A Lot) format which I was able to trace in Studio.


The trick for the mirror effect is using acetate and gluing the 2 cuts of butterfly at the body part placing the acetate in between.  The butterfly at the bottom gives an illusion of a reflection of the butterfly on top.

From a two-fold card, my design progressed into an easel card to display the mirror effect of the butterfly more prominently.  It was quite tricky how to display an unobstructed view of the back of the ‘mirror’ and still be able to create the easel. You’ll see in the photos the strategy that eventually hit my brain. With the Silhouette, everything is just possible!


The butterfly used on top was cut on a cream card stock and sprayed with glimmer mist.  I was able to replicate the rust color of the card stock that I used on the base of the card by mixing orange, brown and black. Manually embossing with a stylus has become a favourite technique which I applied to the butterfly on top, the sentiments and the vine. The butterfly used at the bottom was cut on the rust card stock.

The only files on the card that I can share are the butterfly design and the rosette flower.  Everything else on the card are all Silhouette designs. The base of the shaped card is a tag design called ‘Tag Nesting 
Set Of Two’  which I ungrouped and used the mat layer.  I created the ‘For You’ sentiment but welded it to a Silhouette swirl design.


My next card will be a fun card using another different card design and technique. I already created the template for it so that means another free file.  Watch out for it!

Monday, April 18, 2011

Mother's Day Card


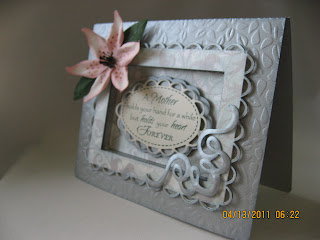
So happy! Finally, I was able to complete my Mother’s Day cards for my most special family and friends.  All cards were mailed last April 14, so hopefully they will get to the USA before the 8th of May.

Needless to say, it is just heavenly to have a template for the recessed window card otherwise I wouldn't be making multiple cards with this card design. The first recessed window cards that I made last year were done manually. So tedious! Sometimes, I wonder, too, where I get all my patience and perseverance, LOL! And the perfectionist me, sometimes I get so mad at myself. But then, I wouldn't have it any other way which makes me appreciate my beloved Silhouette machine all the more :). And with the release of the Studio, Ms. Perfectionist is on a roll and has been doing the happy dance after every cut and newly created designs. What a joy! Thank you, thank you, thank you, my dear Silhouette!  


Something new on this card is the flower design, lily. I saw the flower making videos by Paper Blossoms  a while back and I went crazy looking for the tools used on the video, the Paper Blossoms  tool set.  It has been out of stock and not even the manufacturer, McGill Inc.,  has it in stock. They said it won’t be available till about the end of this month. I was very fortunate to chance on it at Custom Quilling.  The lily flower was my very first project using the tool set. They work like magic in shaping the flowers . You should see the hydrangeas, they look so real. I just found the tiny styro foam balls (one inch) used on the video so this will the next flower I’ll be making.

Paper Blossoms video tutorial on the lily flower:

Another new technique I applied on the card is embossing manually on the cut design using the small tips of the stylus set. It doesn’t look promising as you’re doing the embossing but when you put the un-embossesd cutout  and the embossed cutout side by side, the embossed cutout looks great. It does have a stunning effect. It adds a new dimension on the design. For me,  it’s the next best thing since we are not able to emboss with the Silhouette machine.

You can request for the flower template on your comment.