Come And Join Me In My Creativity Zone

Come and join me in my Creativity Zone where you can enjoy fun and challenging card design ideas that will inspire you to learn new techniques to maximize the use of your craft tools, most especially the Silhouette Cameo machine along with the Silhouette Studio Designer software, and truly enjoy your crafting to the fullest.

All my files are shared for free, ONLY with my blog followers. The files are in Silhouette Studio format. They are for PERSONAL use only and must not be redistributed. You can share by directing people to the link of the project/post on my blog. Thank you for your compliance.

Wednesday, February 20, 2013

Eye Surgery

Dear followers: Please bear with me for not being able to respond to your file requests this past week. I had surgery on one eye and was busy for the preparation. I should be able to start sending the requested files around next week.

Thank you so much for always visiting my blog and leaving the nice comments, most especially to those who wrote me because they were so concerned as to why I have not posted anything on my blog in a long while and wanting to check if I'm okay. That's so sweet and thoughtful :).

I actually have never stopped creating new designs. I have completed about 4 wonderful card designs and although the templates are completed, the actual card assembly are not finished yet. I always get stuck with the embellishments. To give you an idea on what to look forward to, I created a Japanese folding screen card. I started this card in November and I already completed the layers. I just need to finish embellishing it. I had to set it aside to finish my Christmas cards. Once my operated eye has completely healed, I will continue working on them. I'm just not allowed to bend my head downwards for about a month which, as you can imagine, is hard not to when you're working on a project.

My surgery went very smoothly and I'm doing very well. I just need to take it easy and not move around too much.

Happy crafting,
Ligaya

Thursday, February 14, 2013

Christmas Card 2012

Finally! I did finish my Christmas cards on time but unfortunately, I failed to post this soon enough for my blog followers wishing to use the free file for their own Christmas cards last year. But there is no opportunity lost here as the file can actually be used for any occasion, minus the Christmas sentiment (which you can save for Christmas this year).

I fell in love with this leaf design the first time I saw it on a card. I searched for it and found out that it is a punch by McGill which I immediately ordered online. I found out later on that Martha Stewart also has it with the same name 'Pine Branch' which I just ordered. I created a board on my Pinterest with a collection of cards using the Pine Branch. Check out the link to see the beautiful cards:  http://pinterest.com/ligayatg/cards-pine-branch-punch-by-martha-stewart-or-mcgil/

I made good use of my customized bow maker. What an efficient gadget! This is such a tiny ribbon, the bow is only 1.25" wide. For the details on my customized bow maker:  http://ligayatg.blogspot.com/2012/11/bow-maker-making-perfect-bow.html

I used a lot of my homemade 3D/pop-up/dimensional foam tape for the 3D effect of the frame and wreath. I was able to save a lot of money by making my own. For instructions: http://ligayatg.blogspot.com/2012/08/homemade-pop-up-dots-3d-tape-foam-dots.html


I only share my free files with my blog followers. You can become a follower by clicking on 'Join This Site' If you are already a follower, please post a comment to request for the file and PLEASE DO NOT FORGET to indicate your e-mail address on your comment. I always get requests with no e-mail address.

Happy crafting!

Ligaya


Embossing folder by Sizzix


Saturday, December 1, 2012

Gift Card/Money Holder - A Great Christmas Project

I found this holder on Pinterest which was created manually HERE and I immediately created a Studio file. I rushed this project so I can share it with my blog followers in time for their Christmas gift ideas.

I created 3 designs which are all included in the file. I added a layer inside the holder to provide a space for writing a message to the recipient. I also added a tag on the front for the name of the recipient. All the tags are from the Silhouette store.

The names of the Silhouette designs and the embossing folders used on these holders are indicated on the caption of the photo.

This is a very timely project for Christmas and it can also be used not only for gift cards but also for money, checks, gift certificates, tickets and other gifts of similar kind.

I only share my free files with my blog followers. You can become a follower by clicking on 'Join This Site' If you are already a follower, please post a comment to request for the file and PLEASE DO NOT FORGET to indicate your e-mail address on your comment. I just got quite a few requests with no e-mail address.

Happy crafting!

Ligaya


Tag from Silhouette: label frame tag by Samantha Walker
Embossing folder: SIZZIX 'Corner & Lattice Set'


Tag from Silhouette: label frame tag by Samantha Walker
Embossing folder: SIZZIX 'Corner & Lattice Set'


Tag from Silhouette: 3 labels by Lori Whitlock
Embossing folder: Stampin' Up Textured Impression 'Elegant Bouquet'


Silhouette Tag: 2 piece label #3 by Lori Whitlock
Embossing folder: Cuttlebug 'Musical Flourish'


Embossing folder: SIZZIX 'Country Cottage set'


Saturday, November 10, 2012

Bow Maker - Making The Perfect Bow


I fell in love with the concept of the bow maker the moment I saw it on our Silhouette Facebook group, Silhouette Cameo Paper Crafts. I will forever be grateful to Sue Busch who shared a photo of her bow maker customized by her brother-in-law. I got obsessed with it and really spent time searching and watching every bow maker video I can find. I come from a place where there are a lot of skilled furniture makers which makes it easy to have this customized so I thought of creating my own design according to the specifications I need. With the help of my brother, we went to see his friend, Melo, to have it made and after only 5 days, voila, I now have this beautifully hand crafted bow maker. Melo did a great job in following all my specifications from the exact measurements down to the stain color.

It is critical for the dowels to fit snugly into the dowel slots in order to achieve the perfect bow. And the other critical aspect of the design for me is how to secure the dowels for storage and having them laid flat for space saving storage. That's how we came up with the hallowed receptacles for the dowels along the sides on top of the base. Great and happy solution! To complete the bright idea, I created a pouch for the bow maker set. There is actually a better storage solution for the dowels wherein 2 long holes, almost the whole length of the dowel, are drilled inside the base of the dowel which would mean having to increase the width of the base which I was not willing to do as I wanted to minimize the size of the base for less space on my desk when I'm using it.

BTW, before I had my bow maker made, I was very anxious to see if this concept really works. You know how we see all these things being demonstrated on these video tutorials making them look so easy but when we try them ourselves we get so disappointed as they are not really that easy to do and sometimes they don't really work? So I came up with an improvised bow maker making use of 2 chopsticks which I adhered with a double sided tape to the side (inside) of a plastic container (the shape should not really matter). You will see below the very first bow that I made with my improvised bow maker. It is, indeed, a perfect bow! So this convinced me all the more to have my own proper bow maker made.

There are tons of video tutorials out there on how to use the bow maker. For me, this link is the best as it clearly shows the directions of the looping of the ribbon around the dowels in a slow step-by step instructions.: Perfect Bow

For more ideas on ribbons and bows, check out my Pinterest board, http://pinterest.com/ligayatg/ribbons-and-bows/

Thank you very much, Sue Busch, for all the photos and information that you very kindly provided us regarding your bow maker.


Monday, October 29, 2012

Panda Card - For Dustine's 7th Birthday

.
I'm way too early finishing my birthday card for Dustine, my oldest brother's grandson, who will be turning 7 on December 15. I'm trying to finish all the cards due for December birthdays so I can concentrate on my Christmas cards.

Just like a typical boy his age, Dustine is into animals. I made the Angry Birds card for his birthday last year. I got the idea for this Panda card from a post shared by Sue Busch on our Facebook group Silhouette Cameo Paper Crafts. She made this adorable card using the same adorable Panda design from the Silhouette store which I happen to already have in my library. The name of the design is Zoo Panda by Sarah Bailey. Please note that there are two Zoo Panda designs on the Silhouette store which look exactly the same, one is a regular cut file and the other one is a print and cut file. Although I have both, I used the regular cut file. Sue used the print and cut file.


When I purchased my first Silhouette machine (SD) more than 2 years ago, they used to offer the unlimited subscription for a discounted $14.99 a month which meant you can download an unlimited number of designs or ALL at any time during your one year subscription. So we were simply downloading all the new designs being released each week. I accumulated over 13,000 designs. I think I was one among the last ones that were able to avail of this unlimited subscription. When Silhouette America bought the Silhouette line from Quickutz, they never offered the unlimited subscription anymore.So that explains why I can't even remember which designs I already have in my library :).


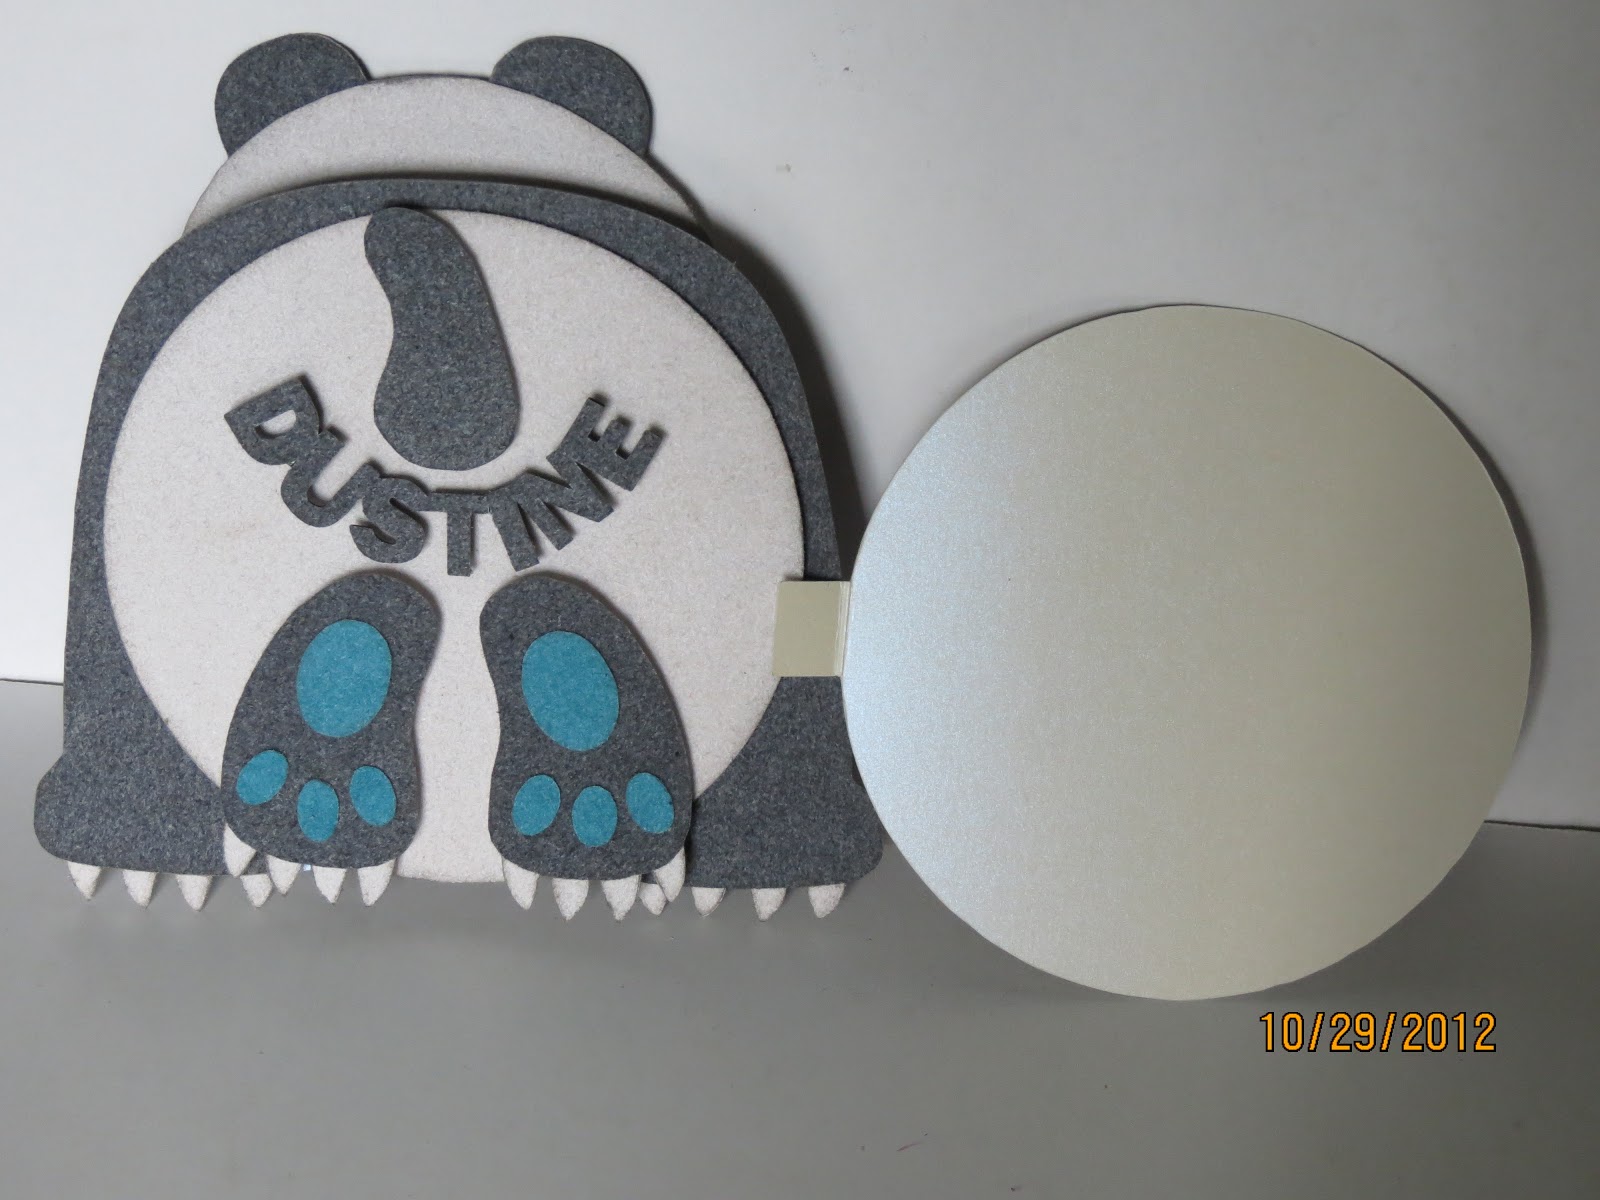
The back of the Panda is even cuter. Just take a look at that butt and the back of his feet with his paws. Sooooooo stinking cute!!!  Dustine will be humored finding his name on his butt. It's so easy to toggle the text into any shape like this using the drawing tools in Silhouette Studio. Instead of writing the step by step instructions on how to do this, I searched for a video tutorial that is very easy to follow, Text-to-Path tutorial by doodling Debbie. This is a great technique to learn about text most especially in creating sentiments. BTW, you will need to ungroup the letters to make sure that the top part of the letters are touching enough so they can be welded together and cut in one piece instead of individually. I didn't want to bother having to arrange the letters one by one on my card after the letters have been cut. There is actually a technique using a mesh tape (drywall tape) in transferring  the arranged text from your mat onto your project: Die Cut Transfer With Mesh.

I made this into a 3D card by using dimensional tape on the layered parts of the Panda using my homemade  pop-up dots.It is also interactive as the head wiggles (see video) using Margaret Wilburn's Springy-Thingy that I've used on my other kiddie cards like Swing Card, Spin card and Angry Birds card.. The card looks so much better in person because of the felt paper that I used giving it a fussy texture/ Instead of the eyes provided in the design, I used a pair of craft eyes which made the Panda even cuter. I created the creases on the face (brows and smirk) so I can cut them and layer them on the face (used black felt paper) and added the 2 tiny ovals for the nose. I also added the 'inside of the ears (used blue felt paper) by doing an internal offset of the ears. I also made the tail larger than the scaled size in the file. The sheets of felt paper that I have are all one sided (plain white on the back/wrong side) so I had to cut 2 pieces for each layer (except for the parts of the face) and glued them together to show the same texture and color on the Panda's back.The actual size of my Panda card is, from the top of the ears down to the tip of the paws is 5.5" tall and 5.5." wide (widest part of the legs).

I was lost as to where to put the space for writing the message on the card as I want to keep the back side of the Panda open and exposed. I replicated the exact same round shape of the body and welded a small tab on one side to be attached (tucked under) on the side of the back of the Panda where I can write my birthday message but I may end up foregoing this part as I don't think Dustine will really care much for it as he will just be interested in the Panda :).